
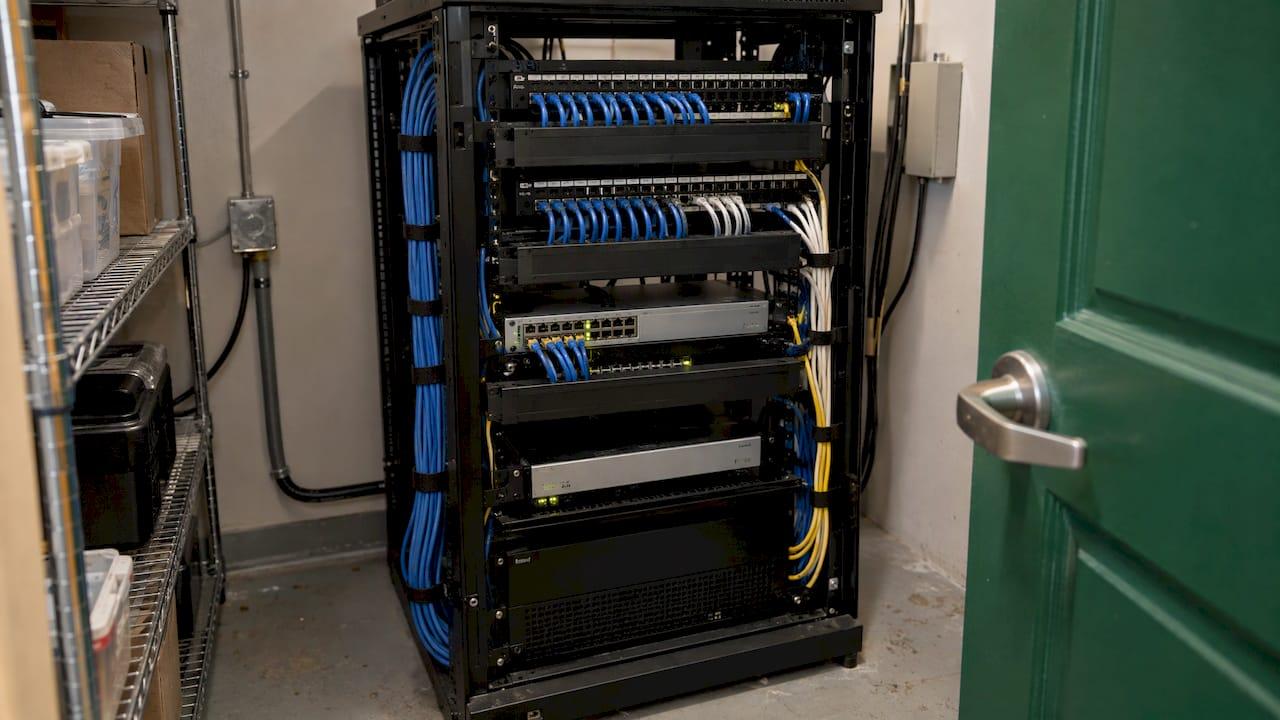
Good rack cable management comes down to five habits. Route power and data separately, bundle with soft hook-and-loop straps, respect bend radius, keep cables out of airflow and away from equipment you need to pull, and label both ends of every run, then document it. A rack built this way is faster to repair, runs cooler and gives whoever supports your network a map to work from. This guide walks through each step, including where it usually goes wrong. For a small business in Norman, Moore or Oklahoma City, the work doesn't end when the rack looks tidy. We pair a documented rack with network management and 24/7 monitoring, so the layout you build stays accurate and problems get caught early.
Key Takeaways
- Neat cabling is a reliability measure. Human error is involved in 79% of data center outages, and a rack you can read at a glance reduces the chance of pulling the wrong cable.
- Use hook-and-loop straps instead of zip ties, keep power and data apart, and never let bundles cover vents, fans or equipment you need to slide out.
- Respect minimum bend radius and leave service slack, especially on fiber.
- Label both ends of every cable with a unique ID and keep the documentation current. A label with no record behind it only helps until the next change.
- A rack is only as good as its upkeep. Ongoing monitoring and a current cable record keep it from drifting back into a tangle.
Table of Contents
- Why cable management matters beyond looks
- The components of a managed rack
- Step 1: Plan the rack layout before you touch a cable
- Step 2: Separate power from data and route cleanly
- Step 3: Bundle with hook-and-loop, not zip ties
- Step 4: Protect bend radius and leave service slack
- Step 5: Keep cables out of the airflow
- Step 6: Label every cable and document the rack
- A maintenance routine that keeps the rack clean
- What a tidy rack still can't tell you
- How we help Oklahoma small businesses keep the network behind the rack healthy
- FAQ
- Sources
Why cable management matters beyond looks
A tangled rack hides problems. When a switch port fails at 4:45 on a Friday, you need to know which cable goes where in seconds, not after tracing a bundle by hand. That is the practical payoff of structured cabling: faster troubleshooting, fewer accidental disconnects and a clear path for growth.
The broader evidence points the same way. The Uptime Institute's 11th Annual Global Data Center Survey reports that 79% of data center outages involve human error, with staff not following procedures and incorrect procedures as the top two contributing issues. A Schneider Electric whitepaper builds on that finding and says effective cable management helps operators handle cables and devices more easily, which reduces mistakes. Your rack may be a half-height cabinet in a supply closet rather than a data center, but the failure mode is identical: someone unplugs the wrong thing.
Vertiv's guidance lists the benefits as less signal interference, easier maintenance and serviceability, cooler operation and room to grow. Each of those shows up in the steps below.
The components of a managed rack
A complete setup usually has six parts, as FS describes in its glossary entry: horizontal cable managers, vertical cable managers, overhead trays, patch panels, labeling, and ties and accessories. For a small office, think of it this way:
| Component | What it does | Where it goes wrong |
|---|---|---|
| Horizontal manager | Takes patch cables between a patch panel and a switch, keeping them off the equipment face | Overstuffed until cables press on ports |
| Vertical manager | Carries bundles up the side of the rack | Too narrow for future growth |
| Overhead tray or ladder | Moves cables between racks or across the room | Sized for today's cable count only |
| Patch panel | Terminates permanent runs so only short patch cables move | Skipped, so wall jacks feed switches directly |
| Labels and records | Identify every run | Labels exist, documentation does not |
| Straps and accessories | Hold bundles and support cables | Zip ties pulled tight on cable jackets |
The patch panel is the piece small offices skip most often. With permanent runs ending at the panel, day-to-day changes happen with short patch cables, and the long runs behind it stay undisturbed.
Step 1: Plan the rack layout before you touch a cable
Start with the room and the rack position, not the cables.
Clearance. Aginode's rack design guidance suggests roughly 1.2 meters (4 feet) in front of racks and 0.6 to 1.0 meters behind, depending on equipment depth. In a small closet you may not get that, but the principle holds: you must be able to open the door, reach the back and pull a device without moving the rack.
Equipment order. Keep a consistent front-to-back orientation, so every device pulls cool air from the same side. Put patch panels and the switches they feed next to each other, so patch cables stay short. Heavy gear such as UPS units and storage goes low. Leave gaps for growth.
Blanking panels. Fill unused rack space. IBM's site preparation guide says filler panels must cover all unoccupied rack space to stop air from recirculating inside the rack. Where cables pass from front to back, Schneider recommends blanking panels with a flexible brush or shield to prevent air leakage.
Pathways. Decide where cables enter. Aginode advises sizing overhead or underfloor pathways realistically for future fill. Add 30 to 50 percent beyond today's count, because networks rarely shrink.
Where it goes wrong: racks get filled in the order equipment arrives, and the cabling is improvised around whatever is already there. A fifteen-minute sketch of rack units, ports and cable paths prevents that.
Step 2: Separate power from data and route cleanly
Keep power and data cables apart. Eaton's rack handbook recommends separating data and power cables to minimize signal interference. In a standard rack, that means power on one side, data on the other. Where they must cross, cross at a right angle.
The same handbook advises bundling cables and running them vertically up the side of the rack and across the top, without blocking any equipment. Avoid running cables across the inside of the rack, which hinders serviceability and can cause overheating.
Outside the rack, TechTarget's network cable guide says to keep cables out of the traffic path from floor level to head height, and to use overhead trays or a raised floor to get from row to row. In an office, that translates to: no cables across a walkway, and no cord draped over the closet door.
Copper and fiber should also run separately. NVIDIA's cable guidance says to keep copper and fiber runs separated and to keep each run under 90% of the maximum distance supported by its media type. If you are deciding between the two media for a new run, this overview of cable versus fiber optic technology lays out the trade-offs.

Step 3: Bundle with hook-and-loop, not zip ties
This is the most repeated advice in every rack guide, and for good reason. NVIDIA's best practices say to use soft hook-and-loop fastener ties instead of plastic. Eaton gives the same recommendation, and IBM recommends Velcro-type straps for fiber-optic cables.
The reasons are practical:
- Zip ties can be cinched tight enough to deform a cable jacket and degrade performance.
- Cutting a zip tie to add one cable risks nicking the cables beside it. A hook-and-loop strap opens and closes.
- Straps are reusable, so changes cost seconds, not new hardware.
Spacing matters too. NVIDIA recommends ties every 12 to 24 inches (30 to 60 cm). Snug is the goal: the bundle should hold its shape, but you should be able to slide a finger under the strap.
Two more habits from the same guidance:
- Pre-bend cable tips before plugging them into a switch, to reduce strain on the port.
- Plug in from the sides toward the middle, so the cables you install last don't block access to the ones already in place.
Bundle by function. One strap group for uplinks, one for servers, one for phones or access points. Avoid giant bundles of 48 cables, which are hard to trace and hard to change.
Step 4: Protect bend radius and leave service slack
Pulling cables tight looks neat and shortens their life. Vertiv's guide says the bend radius should stay within the range specified for the cable type, and that cables must be protected anywhere they could touch sharp edges or high heat.
Fiber is the least forgiving. IBM's documentation gives the minimum bend radius for a 50-micron cable as 5.1 cm (2 inches) under full tensile load and 3.0 cm (1.2 inches) with no load. IBM also recommends leaving at least 1 meter (3.28 feet) of slack for each port cable. Slack lets you pull a device partway out of the rack without disconnecting everything.
Slack needs a home. Coil it loosely in a manager or on a service loop, away from vents. Don't leave it hanging behind a switch where it blocks the fans.
Support matters as well. NVIDIA states that cables should be tied to the rack structure to remove strain on connectors and supported every 2 meters or placed in a tray. A connector that carries the weight of a cable bundle will eventually fail intermittently, which is among the hardest faults to diagnose.
Step 5: Keep cables out of the airflow
A cable bundle in the wrong place acts as a baffle. Vertiv warns that cables should not be placed where they restrict airflow from components inside the enclosure, and that blocked vents and fans can lead to overheating and thermal shutdown or even equipment damage.
The working rules:
- Don't route cables in front of air vents, and keep LED indicators visible, as IBM advises.
- Don't block transceiver or device extraction. NVIDIA's guidance says cables must not block airflow or system unit extraction.
- Keep rear bundles to the side, so exhaust from servers and switches has a clear path.
- Seal gaps. Eaton describes rack hygiene as finding and repairing hot air leakage paths and cold air bypass routes.
A simple test: with the rack running, put your hand behind the busiest switch. If the exhaust air feels hot while a cable curtain sits right behind the vents, re-route before the heat becomes an outage.
Step 6: Label every cable and document the rack
Labeling is where tidy racks stay tidy. The Schneider whitepaper says labeling both ends of power and data cables is part of installation and testing, and points to the ANSI/TIA 606-B standard for labeling cables, racks, panels and patch panels.
What a good label looks like
- Both ends, near the connector. The older TIA-606-A addendum says each end should be labeled within 300 mm (12 inches) of the end of the cable jacket. The text should be sans serif, upper case and large enough to read while standing near the rack.
- Unique ID. TechTarget suggests a number or alphanumeric code that embeds information about the run, such as the closet it starts in, and that is unique across the places where runs end.
- Printed, not handwritten. The University of New Mexico's labeling specification requires mechanically printed labels on flexible vinyl or similar material with strong adhesive, built to resist moisture, heat and UV and to outlast the component they mark.
- Color for function. TechTarget suggests color coding by function (data, storage network, KVM) using colored tape near the cable ends instead of colored cables, so patch cables can be reused freely.
A simple scheme for a small office: R1-PP1-24 for rack 1, patch panel 1, port 24, with the same ID on the matching switch-end label or an entry that maps to it.
The record behind the label
Schneider calls documentation the most critical cable management task: diagrams, cable types, patching information and cable counts, kept accessible and assigned to one or more staff members for updates. In a small business, that last part is where it usually breaks. The person who built the rack leaves, nobody owns the spreadsheet, and within a year the labels and the records disagree.
Keep at least this for every rack: a rack elevation (what sits in which unit), a port map from patch panel to switch to device, a power map showing which outlet feeds which device, and a change log with dates.
A maintenance routine that keeps the rack clean
The first install is the easy part. Each moves, adds and changes cycle is when order erodes. A short routine helps:
- After every change: re-strap loose cables, update the label if a run changed and update the port map the same day.
- Quarterly: walk the rack. Look for cables hanging free, straps cinched too tight, blocked vents, empty rack spaces without blanking panels and labels that no longer match the record.
- Annually: compare the documentation against the physical rack, port by port, and check capacity: spare ports, spare power and room in the managers.
- Before adding equipment: confirm space, airflow, power and cable pathways, instead of squeezing one more device in.
This routine is also where an outside team pays off. Keeping records current is routine work that gets pushed aside when the office is busy.
What a tidy rack still can't tell you
Physical order covers the layer you can see. It doesn't tell you that a switch port is flapping at 2 a.m., that a firmware update is overdue or that a backup job failed. That is the work of monitoring and support. The same discipline applies on the network side: for example, our guide on segmenting office networks safely shows how clean logical design complements clean physical design, and shops that run production equipment can see the same thinking in our steps to reduce manufacturing network downtime.
How we help Oklahoma small businesses keep the network behind the rack healthy
We provide managed IT support for small businesses in Norman, Moore and Oklahoma City, including network management, 24/7 monitoring and a helpdesk with same-day response. We explain things in plain language and don't require long-term contracts.

If you want a clear picture of your current setup, start with our free network assessment. Our 10-minute readiness audit is another no-cost starting point. Both are zero-cost, one-off offers. When you're ready for ongoing coverage, Network Management and Managed IT Support are where your rack, switches and the rest of the network get looked after together.
FAQ
Should I use zip ties or Velcro for rack cables?
Use hook-and-loop straps. NVIDIA, Eaton and IBM all recommend soft hook-and-loop ties over plastic zip ties. They don't crush cable jackets, and you can open them to add or remove a cable without cutting anything. Space them roughly every 12 to 24 inches.
How much slack should I leave on rack cables?
IBM recommends at least 1 meter (3.28 feet) of slack per port cable. That lets you slide a device partway out for service. Coil the slack loosely in a manager, and keep it away from vents and fans.
What should a cable label include?
A unique identifier, printed on both ends within about 12 inches of the connector, in a clear sans serif upper-case font. Keep details such as circuit purpose and IP addresses in your documentation. The label's job is to point to the record, and the record's job is to hold the details.
Does cable management really affect cooling?
Yes. Cables placed in front of vents or behind fans can restrict airflow and cause overheating or thermal shutdown. Blanking panels in empty rack units and bundles routed along the sides keep air moving the way the equipment was designed.
How should I separate power and data cables in a rack?
Run them on opposite sides of the rack where possible and cross them at right angles when they must meet. This reduces signal interference and makes it clear which bundle is which when you service the rack.
Sources
- Uptime Institute 11th Annual Global Data Center Survey
- Planning Effective Power and Data Cable Management in IT Racks (Schneider Electric whitepaper)
- Applying Proper Cable Management in IT Racks (Vertiv)
- Rack Cable Management (FS glossary)
- Designing data centre racks for density, airflow and peace of mind (Aginode)
- Power Systems: Site preparation and physical planning (IBM)
- Fundamentals handbook (Eaton)
- A network cable management guide (TechTarget)
- Cable Installation and Management Guidelines (NVIDIA)
- Cable Management Best Practices (NVIDIA DGX SuperPOD)
- Cable Management (IBM)
- ANSI/TIA/EIA-606-A Addendum 1
- Identification for Communication specifications (University of New Mexico)
- Cable vs Fiber Optic: Choose the Best Network Solution